Monday, 23 April 2012

Everyone loves a steno cake!

It has been decided that stenographers are to be replaced at the Old Bailey by a digital recording system (http://www.independent.co.uk/news/uk/home-news/art-of-court-stenographer-faces-the-final-sentence-7584129.html) Ridiculous decision that will result in an awful lot of trouble and delayed trials I'm sure, and also absolutely gutting for all the stenos who work there. Booo!

To try and put a bit of cheer into the last day of the Bailey, I made a steno cake modelled on my own machine. Consequently, my Stentura 8000LX is now all sticky. Working from a photo might have been a better idea than having my steno next to me while I threw icing sugar all over my kitchen.


Anyway, onto the steno cake tutorial!

You'll need a 20cm x 20cm square cake tin - mine is a loose bottomed Prestige tin - and then whip up some sponge. I made mine out of marble cake, which is simply:

*NOTE: YOU WILL NEED DOUBLE THE AMOUNTS LISTED HERE AS YOU NEED TO BAKE TWO CAKES!*

6 oz caster sugar
6 oz Stork margerine
6 oz self-raising flour
1.5 tsp of baking powder
3 eggs
1 spoonfull of cocoa powder

Mix the sugar and margerine (I use Stork as it's good for baking, but you can use whatever butter or marg you like) and cream them together so its nice and smooth. Then sieve in the flour and baking powder, mix well, then in a separate bowl whisk the eggs and bosh them in. Give it a good stir until it is nice and smooth, then divide the mix between two bowls. Add the cocoa powder to one of the bowls and mix well until it's a nice chocolatey colour.

Take your tin and grease with a bit of butter, then line with baking parchment to stop it sticking. Take a spoonful of your original sponge mix and drop it in, then drop a spoonful of the chocolate mix and drop it on top. Repeat, alternating between the two mixes, until you've used all your cake batter.

Stick it in the oven at 180 degrees for 25-30 minutes. Don't open the door before 25 mins because it might sink (sad!) but after that it'll be safe to stick a metal skewer in and check it - if the skewer comes out clean it's ready so whip it out the oven and let it cool.

Ta-do! Now, when the cake is cool, turn it onto a board and then wash the tin. Repeat the whole cake making process again (this is a big cake!) and then when that's done let that cool too.

When the cakes are ready, stack them with some jam and icing in between, and  then carefully carve the two bottom corners off and then shape the cakes so it vaguely resembles a steno machine. You want the shape to look like this, but don't worry if it looks a bit rough because it'll be covered in icing anyway:


Carefully carve a rectangle shape across the bottom half of the cake (for the keys) and then dig out the sponge to make a little gap. We will stick keys in there later.

Now for the fun bit! Take a packet of sugar paste (I used this: http://www.tesco.com/groceries/Product/Details/?id=252623113) and knead it with your hands until it is nice and pliable. Put a small piece aside, and then add a few drops of food colour to the icing and knead until the colour is nice and consistent, and as deep as you like, add more if it needs to be darker. I use food colour paste as it's a lot less sticky than the liquid ones you tend to find at the supermarket. You can buy it online and it lasts ages (I use Sugarflair, because it's amazing http://www.cake-stuff.com/paste-gel-icing-colourings-c-7.html)

Note: if you want to make a black machine, you may have to pre-buy some black icing because it is quite tricky to get a nice colour when you do it yourself (comes out a bit grey!) but you can get that online easy-peasy.

Now cover the cake in jam - all over the top and a bit on the sides. When the icing is ready, roll it out with a rolling pin (and lots of icing sugar so it doesn't stick!) and drape over the cake. Smooth the icing carefully into the gap you've left for the keys and then down the sides. Flatten the excess icing against the surface you are decorating on, then use a sharp knife to run round the edge. This will give a nice clean finish. Save the excess icing and add some more food colour to make a deeper colour.

Use the deeper coloured icing to add detail to your steno machine - I used it to go round the keypad and make the screen. I made the keys out of pre-bought black icing, which I rolled into small balls and placed into the dip left in the sponge. I also used black icing for other little details on the side of the machine, screws etc. You can stick extra 'screws' over any errors, if you've made some!

Take your little bit of leftover white icing and roll it into a long rectangle, attach to the back of the machine as the paper.

Mix up a bit of buttercream icing (2 oz unsalted butter, 8 oz icing sugar, splash of milk) and colour it dark brown. Put into a piping bag and go around the keypad area and then add some line detail to the top of the machine.

Finally, use a black food colour pen (or a small tube of black writing icing which you can buy in most supermarkets) to write a message on the screen, and add any other final details you want. You can also write a message on the paper if you so wish, but best to do this before it goes onto the cake as it'll be easier to write on it when it's flat.


Voila! Steno cake! I put a bit of edible glitter over the paper as well, because I had some! Just colour a bit of icing grey, brush with edible glue and then scatter the glitter. When it has dried, place it over the paper and use two small circles of grey icing to attach.

Tuesday, 28 February 2012

Russ on a Bus!

For Adam Moon, a celebration of our favourite poem!


For this I used ready made red and black icing (mine always comes out pink/grey when I try to make it!) which worked really well! I always love putting a steno machine on a cake.


Chris Hull loves crisps...

...so I made him a Skips cake!


I just iced a square marble cake with yellow icing and then used red and pink sugarpaste to do the packet design, easy! Those are real Skips...not sure how well they went with the cake? Chull will have to report back on that one!


ELBOWS!


Fad can't get off a chairlift without sticking his elbows out and knocking down the unfortunate person either side of him, this is a fact of life. For his birthday I decided to put this phenomenon on a cake!


I baked a square marble cake, covered it in white icing and then made a chairlift out of sugarpaste and white chocolate Mikado biscuits (they worked amazingly!) I then made Fad, April and myself out of sugarpaste and  positioned on the cake, affixed with edible glue.


The skis are more Mikados (coloured with blue food colour paste) and the ski poles are spaghetti strands coloured black! Very easy.


The face detail was done with my black felt tip food colour pen. I added icing sugar and snowflake sugar decorations to give the surface a bit of texture.


I made Fad out of sugarpaste and then stuck him to a cardboard backing to keep him upright. The elbows were easy to keep in place - I just joined them to the chairlift!


Knit fast, die warm.

Cat Kelly's knitting cake! Inspired by this design:


This was the finished cake:


I baked two sponge cakes and sandwiched them together with butter cream icing and strawberry jam. Then I carefully carved a little off each side to make the cake oval shaped. I was going to invest in an oval shaped cake tin but the chopping method worked just as well!

I covered the cake in blue sugarpaste to start.  I then mixed up a big batch of butter cream icing, divided it into two and coloured one green and one blue. I used a piping bag with a small nozzle to pipe on the lines of yarn, green first and then blue in between.


Then I cut a rectangle of white sugarpaste which I attached to the middle of the cake, and then wrote "Knit fast, die warm" using my black felt tip food colour pen, then decorated with sugar balls (from cakecraft.com)

Finally, I made some knitting needles out of cookie sticks with a bit of sugarpaste on the end and put them through the cakey ball of yarn, then transferred it onto a silver cake board....


Sadly it got so mashed in transit, but at least I got photos when it was still pretty!

Monday, 27 February 2012

Kilimanjaro Kim!

Kim Smith climbed Kilimanjaro - an amazing feat that definitely deserved a cake! I didn't get round to creating one until a year and a half after her climb (!) but got there in the end!


I started by baking two small round vanilla/chocolate marble cakes. My marble cake recipe is just a basic sponge (6oz caster sugar, 6oz Stork marg, 6oz s.r. flour, 1.5 tsp baking powder, 3 eggs) divided into two bowls; flavour one with a tsp of cocoa powder and one with a few drops of vanilla extract. Try not to use vanilla essence unless it's all you can get - extract is natural and essence is a by-product of the paper industry, which is pretty nasty! But they both do the same job of flavouring the cake so it doesn't make a huge difference.  

When you have your two cake mixes, drop a spoonful of vanilla into the cake tin and then follow with a spoonful of choc on top. Repeat until you've used all the mix and then bang the tin on the work surface to make sure the mix goes up to all edges (BE CAREFUL IF YOU ARE USING A LOOSE BOTTOMED TIN!) Then bake for 25 mins at 180, it might need a little longer, when a skewer comes out clean (no gunk) it's done.


When the cakes were cool, I covered one in grey butter cream icing to make the base of the mountain. I then chopped the other cake into square cubes, covered a few in sugar paste that I coloured a light grey and stacked them on top to make the top.  I used a bit of grey butter cream as a sort of glue to hold it all together, and also to give the mountain a more rocky effect. I drizzled some white glace icing on top (and some white sprinkles!) for the snow. 

Then I made Kim....


I just used coloured sugar paste to make her clothes, backpack, face and hair and attached it to the side of the cake with edible glue. Very easy! I drew on her facial features and other detail with my black food colour felt tip pen.

Finally I finished the cake off by writing a message in blue icing, mounting it on a small cake board, adding some green glace icing for grass and attaching some animal decorations I found in the Jane Asher shop...


Jambo!

Thursday, 1 December 2011

Pass that Dutch: Mean Girls cake.

Sebrina Miller has just celebrated her first UK based birthday in SIX YEARS! To celebrate, I made her a Mean Girls cake - one of our favourite and most-quoted movies ever. To put the cake in context, this clip is essential...


She just has a lot of feelings! The challenge was set - I was going to bake a cake full of rainbows and smiles and we would all eat it and be happy. To do this, I mixed up my cake batter and then divided it into five bowls. To those bowls I added red, orange, yellow, green and blue food colour and mixed until it was evenly coloured. I then dropped the mix into lined baking tins; a big blob of red first, followed by orange on top, then yellow, etc, etc. I did the same but reversed (starting with blue) for the other tin. I gave the tins a little shake to even and fill out the tins, then popped them in the oven for 25 minutes.


Voila! Having never tried this before, I had no idea what they would turn out like, but I was excited! Then I decorated...


I covered the cake in pink sugarpaste and then shaped five faces out of flesh coloured sugar paste. I added detail (hair, clothes, spinal support frame, etc) using more sugarpaste that I coloured myself. Karen is wearing her Halloween outfit ("I'm a mouse...d'uh?") Regina is wearing the sabotaged vest that sparks a school fashion craze and Damian is in his disguise, of course! 

I stuck the figures onto the cake surface using edible glue (I found it online, it's awesome!) and then added the speech bubbles, writing the quotes with my (favourite!) food colour felt tip. I went round the speech bubbles using a green icing pen (just to tidy them up) and then made four sugarpaste candy canes, labelled to Glen Coco ("Four for you Glen Coco, you go Glen Coco!")


If you don't recognise the figure on the right, that is OF COURSE Danny Devito....


I took the cake to Birmingham for Seb's birthday meal (it survived the journey, amazingly!) and the nice lady at Waga brought it out. She didn't understand what was going on and thought, upon reading the speech bubbles, that I had made a RACIST CAKE to celebrate a birthday! Quickly set her straight on that one.

When Seb cut into it, it was FULL of rainbows!


Absolutely bonkers. Perhaps not the MOST appetising-looking of cakes, but it tasted good!

Happy Birthday Seb!


Isle of Wight Cake: we love Steephill Cove!

For my Mum's birthday - Sue Mann, huge IOW fan - there was only one choice for her birthday cake...


As Mama is gluten intolerant, I made the cake with rice flour substituting for regular self-raising flour in my sponge recipe. I was a bit worried it would taste funny (the cake batter certainly did!) but when baked it was actually fine. I still would have preferred to use Dove Farm gluten free self-raising flour but sadly my local Tesco was out of stock when I went shopping for my ingredients so rice flour was my emergency back-up!

I baked a rectangular sponge and then, when cooled, shaped it into the IOW shape. I covered in green sugarpaste, then used white royal icing for the cliffs, green royal icing for the land surface, and blue for the sea. To create the swirled sea, I mixed a batch of darker blue royal icing and used a cocktail stick to swirl it into the lighter blue sea which produced a marbled effect. I made the coast with a sprinkling of golden caster sugar, but you can also use crumbled up cookies (make sure they are gf if you are making a cake for a coeliac!) which would look better - my sugar got a bit absorbed in the sea!

I then added The Needles and Steephill Cove Lighthouse (where we celebrated Mum's birthday!) and finally a Red Funnel ferry coming into East Cowes from Southampton. Generally a very easy cake to make, and Ma loved it! :)

Bon Voyage Tbay!

Tim Baker (Old Bailey clerk extroadinaire) has left freezing cold London and fled to Barbados...sensible! Barbados marks the start of his travels all over the world, and just in case he forgets his route I decided to put it on a cake for him...


The cake was a Victoria Sponge full of icing and jam, covered in blue sugarpaste, with green sugarpaste land (with added glace icing and turquoise glitter to make it fun!) I then made a little airplane, destination markers, and linked them all together using a fantastic black food colour felt tip I got from the Jane Asher shop in South Kensington - probably the best cake decorating aid I've ever had!

To finish off, I put it on a gold cake board, added detail and writing with a purple glitter icing pen and then an obligatory cocktail stick speech bubble....


Bon voyage, Tbay! Have fun!

Monday, 3 October 2011

Welcome....to Jurassic Park *Letter of the Month in Empire! Life made!*

For Stephen Sambrook's Southamptoversary there was only one obvious choice, frankly, for a ridiculous cake to celebrate such an occasion...


Jurassic Park! Raaa! I made loads of cherry and coconut cake (recipe: 16 oz sugar, 16 oz butter, 16 oz self raising flour, 3 tsp baking powder, 6 eggs, 4 oz dessicated coconut, handful of cherries halved - but I stuck them into the cake post-bake so they didn't sink/make the cake go squidgy) Once it was cooled, I cut the sponge into roughly the right shape of the T-Rex and the two Explorers and arranged on the cake board.

I iced the Explorers with yellow sugarpaste as a base, then a layer of green over the top. I added the detail with a black food colour pen and a red icing pen. Then I made a road out of grey icing, attached that to the bottom of the cake board and stuck the Explorers on top with edible glue.

For the T-Rex, I coloured a load of icing grey and covered the dinosaur cake shape. Then I added detail with black icing (to make him look a bit scaly!) and textured the surface with a skewer.

Then I did the face...


I used dark grey and yellow to colour more sugar paste for the eye, then used my FAVOURITE teeth ingredient - flaked almonds! I also used them on the Jaws cake, they work for any cake involving a creature with big teeth!

To finish off the cake, I used my white glitter gel pen to make rain (as there is a big storm going on during this scene in the movie) and also added detail to the road. If I was to re-make this one, I would have turned one of the Explorers upside down and messed it up a bit....and maybe added some bits of dismembered goat!

Sent a photo of this one to Empire (my favourite magazine) and they bloody printed it as letter of the month!


Thanks, Empire!

Tuesday, 27 September 2011

Wagamama ケーキ

Sezreg threw a birthday bash last month and so I asked what sort of cake I could make her. She requested either Harry Potter or Wagamama. I would LOVE to do a Potter cake at some point, but decided that a Waga cake could be really fun, so constructed a bowl of ramen out of Victoria Sponge and icing...


I made the bowl using my ever so handy giant cupcake tin (the same I used for Windsor's head!) but without the top, so I just got the bowl shape with the dip in it - perfect for a Waga bowl! I coloured some sugarpaste with my chestnut brown dye and covered the bowl, then used white sugarpaste to line the inside of the bowl. I then whipped up some buttercream, made it slightly lighter in colour, and used it to add detail to the bowl...


Then using sugar paste I made noodles, chicken, pak choi, greens, tofu, kamaboko and a slice of lime and layered them inside the top of the bowl. I made a thin glace icing which I drizzled over the top for the miso soup...


Then I garnished with chopsticks and some wicked Happy Birthday candles I got in Waitrose, oishii!


Sunday, 7 August 2011

Tom Windsor

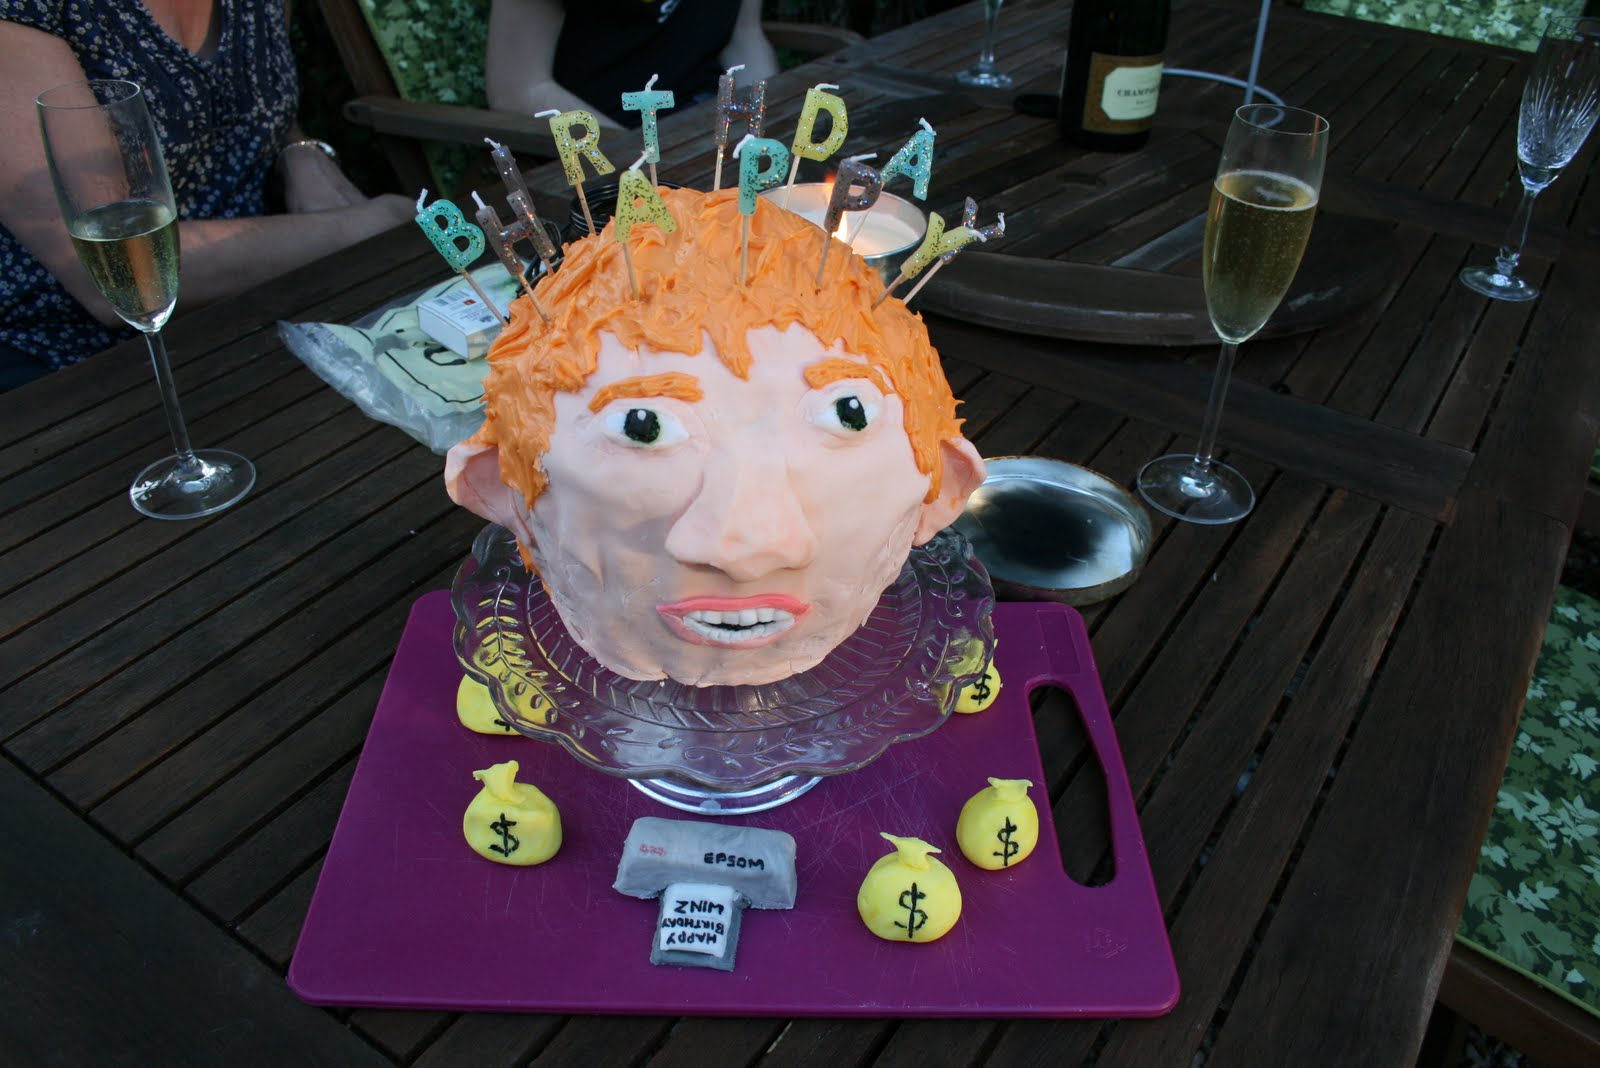
What better way to say happy birthday to someone than by making a lifesize cake sculpture of their head?


Happy birthday Tom Windsor! I made the head by using a giant cupcake (with the pointy top sliced off) and filled with raspberry icing (recipe: 4 oz butter, 10 oz icing sugar, glug of milk, handful of fresh raspberries - blend!) I then covered the whole cake in sugarpaste coloured to look like skin (equal parts red and yellow colour) then added ears and nose which I stuck on with edible glue...


Then I mixed up a batch of very, very, VERY orange buttercream for the hair, which I roughly smoothed all over the head with a spatula...


Then I used sugar paste cut-outs for the eyes, mouth and teeth, which I stuck on with edible glue. And voila! Windsor's cake double was done.


I finished it off with a printer (he really wanted a printer involved) and some bags of swag - my bro's idea to symbolise Winz's thievery over the years. Head cakes are clearly the future - easy to make and there are all sorts of fun photo opportunities to be had, see below:


Voodoo cake!

Looks like there's going to be a clean up on aisle five...

Sarah Wellock's birthday demanded a very ridiculous Office-themed cake, and so Threat Level Midnight cake was created!


Starring Michael Scott as Michael Scarn, Dwight Schrute as 'Dwigt' and Jim Halpert as Goldenface.

Monday, 1 August 2011

Pacman Cupcakes - Happy Birthday Janeo!

Jane gave me total freedom to choose the theme of her birthday cake - so I picked Pacman!


I had seen some cakes similar to this on another cake blog (can't find the link now to give them credit, or else I'd post it!) so thought I'd have a bash. Sadly my black food colour doesn't go as black as I'd like so the colour contrast isn't as good as I wanted, but they still came out ok. These join my Mario cake as part of the Ridiculous Cakes Gaming Series: http://ridiculouscakes.blogspot.com/2011/04/hey-maaario.html !
Friday, 15 July 2011

Penguin Flavour Cake Pops

I have wanted to have a bash at making cake pops for a while now, so decided to try yesterday as I had the whole evening free and a charity bake sale on Saturday to bake for. I made penguins, inspired by my trip to London Zoo Lates last month!


I found a recipe on BBC Food, and in a bowl combined cake, melted dark chocolate, mixed nuts and some dessicated coconut. Then I rolled the mix into balls, stuck lolly sticks in, placed them on a baking tray and stuck them in the fridge for an hour to cool. While they were chilling, I melted white chocolate and then added enough black food colour to make it a penguin-y grey colour. Then I took the cake pops out the fridge, dunked them in the chocolate, used a spatula to smooth out the surface and then let them set before adding detail.


I used uncoloured melted white chocolate for the penguin belly, then I coloured a block of sugarpaste orange to make the beak and feet. The eyes are white sugarpaste with lids and eyes drawn on with my new food colour pen I got from Jane Asher - it's awesome!!

Unfortunately, I think I made the cake pops a bit big, as LOADS of them fell off when I dunked! So I have ended up with about 12 pops, and then a small army of penguin cake balls which still look fine, they're just not pops.


So cute!